Friday, August 31, 2012

Change the default icon of Windows 7 Libraries

0 comments
The default Windows 7 Library icons can get boring after a while. There is a tool which does this in a very quick manner:
Library Icon Changer, which was made by bluefisch2000 from deviantART.
(Property of deviantART)

There is another way, which is way slower, but you may understand how things work with the libraries. Open up Notepad/Notepad++, and drag one of the libraries which are found in "C:\Users\<user>\AppData\Roaming\Microsoft\Windows\Libraries" to the editor.
The <IconReference> tag represents the current icon. You may enter the path to an .ico file, or some DLL.

Thursday, August 30, 2012

Add thumbnails for FLV, MKV, MP4 files to Windows Explorer

5 comments
Windows comes with thumbnails for only few formats, which are natively ran without the need of third-party software. If you have new content with different format, it won't be able to play if you don't have correspondent codecs. And if you are like me, and you want every format to have it's thumbnail, than this is the perfect place to search.

I present to you, Icaros Shell Extension 2.0.0. This is a software which lets you have thumbnail for essentially every media format.


Install Icaros Shell Extension, run the .exe file, and type the extensions you want added in the textbox.
(Note: Every extension must start with "."(period) and end with ";"(semicolon))
After adding new extensions, press Activate Icaros, and you are done.

Download Icaros Shell Extension 2.0.0

If you have any problems or questions, please leave them in the comment section.

Wednesday, August 29, 2012

Configure NetBeans 7.x C++ compiler (MinGW)

11 comments
Alright, the reason you are here is clear. You are having trouble setting the C++ compiler correctly with NetBeans 7.x on Windows platform. No worries, it's an easy fix.

First, we need the MinGW compiler package. Head on to http://sourceforge.net/projects/mingw/files/ to get the latest version.
You may see another version, of course newer than the one in the above image.
Open up the .exe file you just downloaded, and proceed with it's installation. You will encounter a dialog which asks you if you want the pre-packaged repository catalogues, or download the newest ones. It's always better to download the latest catalogue.

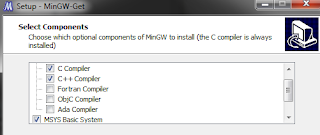
You may proceed with the installation. Few steps ahead, you will be asked which compilers you want downloaded and installed. Check C, C++ and MSYS Basic System.

Continue the installation.
The installer will download and install the newest MinGW and MSYS components.

After it's finished, open Computer, right click on some empty spot, and press Properties. Or, open Computer, and click System properties in the menu-bar.
Go to Advanced system settings, Environment Variables, in the System Variables list, find the variable Path.
Now, double click it, and put your cursor at the end of the Value textbox.
Add semicolon right after the last character (only if it isn't another semicolon, in which case you just paste the directory) and paste the location of the MinGW bin directory (Usually C:\MinGW\bin). Now add another semicolon after the MinGW bin directory, and paste the MSYS bin directory (Usually C:\MinGW\msys\1.0\bin).

Press OK on both dialogs, and open NetBeans.

Go to Tools-> Options-> C/C++, and press the Add button which is found below the Tool Collection panel.
For the Base Directory select the MinGW bin folder, and press OK.

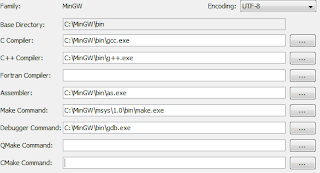
After this step, NetBeans should recognize and select automatically all the needed compilers, except the "make" command. If you select the mingw32-make.exe file, it will be refused.
The make.exe file is found in the MSYS bin directory. 
Press OK to close this dialog, and restart NetBeans. Your adding of C++ compiler to NetBeans 7.x is completed.

If you have any problems with the setup, feel free to post it here.


Saturday, August 25, 2012

Quick way for logging off users

0 comments
If your computer has more accounts, and some users don't log off after using it, you may log off them very quickly.
Press Ctrl+Shift+Esc (This pops Task Manager), go to the Users tab, right-click the user you want to log off, and press Log Off. On the next dialog, just confirm it.


Monday, August 20, 2012

Small Windows clock trick

0 comments
This is a small trick which changes the AM/PM text with whatever you want. You can use it to impress your friends, or confuse them.

First, click on the clock in the traybar. It will pop up a calendar and analog clock. Click on the "Change date and time settings..." link.


 Now, in the next dialog click "Change date and time..."

 Click "Change calendar time" in this dialog.

And finally, in the next dialog you can change the AM/PM text.


How does it look like? Here is an example:


Monday, August 13, 2012

Change Windows 7 start button

0 comments
If you are bored of the old Windows 7 start button, you can try this freeware application which changes the start button with one click.
Image courtesy of www.thewindowsclub.com


It includes 10 new button looks, but you can make your own too. 
This is a start orb I created, that fits the
default mouse-over, and mouse-click taskbar icons.


How to make custom icon:
  • The icon is formed from three 54x54 images merged together in vertical line. 
  • The first image is the default, the second is mouse-over, and the third is mouse-click.

Create three icons, merge them in your favorite image editing software, save as .bmp, and you may use it in the W7SBC.

ASUS Microphone Skype problem fix

5 comments
This problem usually occurs because Skype uses the microphone jack as a default port for audio recording device. To use the laptop microphone instead of an external one, do the following steps:

Right click on the Volume Icon in the traybar, click Recording devices, say something to the laptop mic, so you can see the bar moving and see which mic is the laptop one. 

Now, right click the laptop mic, press Properties and rename it "Laptop mic" for future use (You can also rename the external port too), and press OK. Right click the "Laptop mic" icon now, and select it to be Default Device, and Default Communication Device.

Now, open Skype, go to Tools -> Options -> Audio Settings, and in the Microphone drop-down menu, select Laptop mic. 


(Yes, you can go to Skype, and select the other microphone without setting the laptop mic as default, but on the next restart Skype would set the external jack as it's recording device.)

Remove Facebook ads (Adware)

0 comments
If you notice ads showing on the left side or just below your cover when you browse through your Facebook feed, that means you have Adware on your computer.

Image courtesy of www.facebook.com

It's usually installed silently during some software installation (usually free software, like Anti-Viruses, free downloaders, etc.), and it's automatically added to your browser extensions.
You may find it and delete it by going to your browser's extension page (Tools->Extensions for Chrome, Tools->Add-ons for Firefox). If you see an extension with weird name, just uninstall it, restart your browser, and the ads should be gone.

The normal ads however, can be removed with AdBlock.

Many advertising companies nowadays use 'tricks' to attract as many customers as possible. You can check out some of their techniques (for example tapping into new senses) on the following link:


Friday, August 10, 2012

Best Chrome extensions

0 comments
Chrome is the world's most used browser with 32.76% usage share of web browsers. It's popularity is owed to the fast response time, low memory usage, very nice extension integration, and the fact that it's made by Google.
I'll be talking about the best extensions for Google Chrome in my opinion, and how can they affect your browsing experience.


This one is my favorite, because makes the pages load a lot faster without the unnecessary ads which clutter the viewing space.


Especially good for learning from videos, cause it helps you focus on the video, and not on the comments or related videos.


Adds a colored circle icon to every URL which represents the trustworthiness of that site. Really useful if you are using online shop, or downloading a file.


Now you don't have to open an image link just to see the full sized image. Put your cursor over the picture and it will appear in it's full dimension.
There are quick options like:

  • Save image: (S)
  • Open in new tab (Shift+T)
  • Hide the image (X)

Really useful if you are browsing forum thread with many pages. It makes endless scrolling in the thread, and lets you read the whole thread without clicking the 'next' button. It also supports Google Search.
(It also has a lot of unnecessary options, and I recommend you to turn them off. Tools-> Extensions -> Fastest Chrome Options)


Monday, August 6, 2012

How to block IP from accessing your PC

0 comments
Today, there are many malicious programs which infect your PC, and then allow the attacker to see private and important data from your computer. The best way to protect from the attacks is by using an anti-virus program.
But, sometimes even the antivirus makes mistakes. For example, Avast (which is my personal worst AV, although it's free) didn't pick up a direct connection from USA botnet to my friends PC, which was installed from a Google Chrome extension.
How did I stop that connection? Here are the steps:

  1. Start "Command Prompt" (Win+R -> type "cmd" without the quotes)

  2. Type "netstat -a" (without the quotes)
    • If you like the IPs exported to a file, type "netstat -a -> file.txt". A "file.txt" file will be created in the directory you are in.

  3. If you notice some suspicious IPs there, you can Google them, and if they lead to nowhere, or they lead to some site that you do not recognize, it's best to add them to the "hosts" file (next step).
  4. Open Windows Explorer, and go to "C:\Windows\System32\drivers\etc\". You will find a "hosts" file without any extension.
  5. Double-click the file, and open it with Notepad.
  6. Below the lines which have "#" add "127.0.0.1" followed by space, and then the IP you want to block. 
  7. Save the file, restart the PC, and all the IPs(and addresses) you added will be blocked next time your PC starts.
Good luck!


WindowsBro | Windows tips, fixes, help.. Copyright 2008 All Rights Reserved Revolution Two Church theme by Brian Gardner Converted into Blogger Template by Bloganol dot com